-
Empty cart
No products in the cart.
Return to Shop

This design was part of our 2024 OCT releases and has been archived to the Serev3D Vault.You can still get the files:
– by purchasing it in our Serev3d web shop, or
-by keeping an active paid Patreon membership with us for 3 consecutive months: on the 3rd month we unlock The Vault for you with the access to our entire Serev3D library!
————————–
If you already have the file, here is all the INFO:
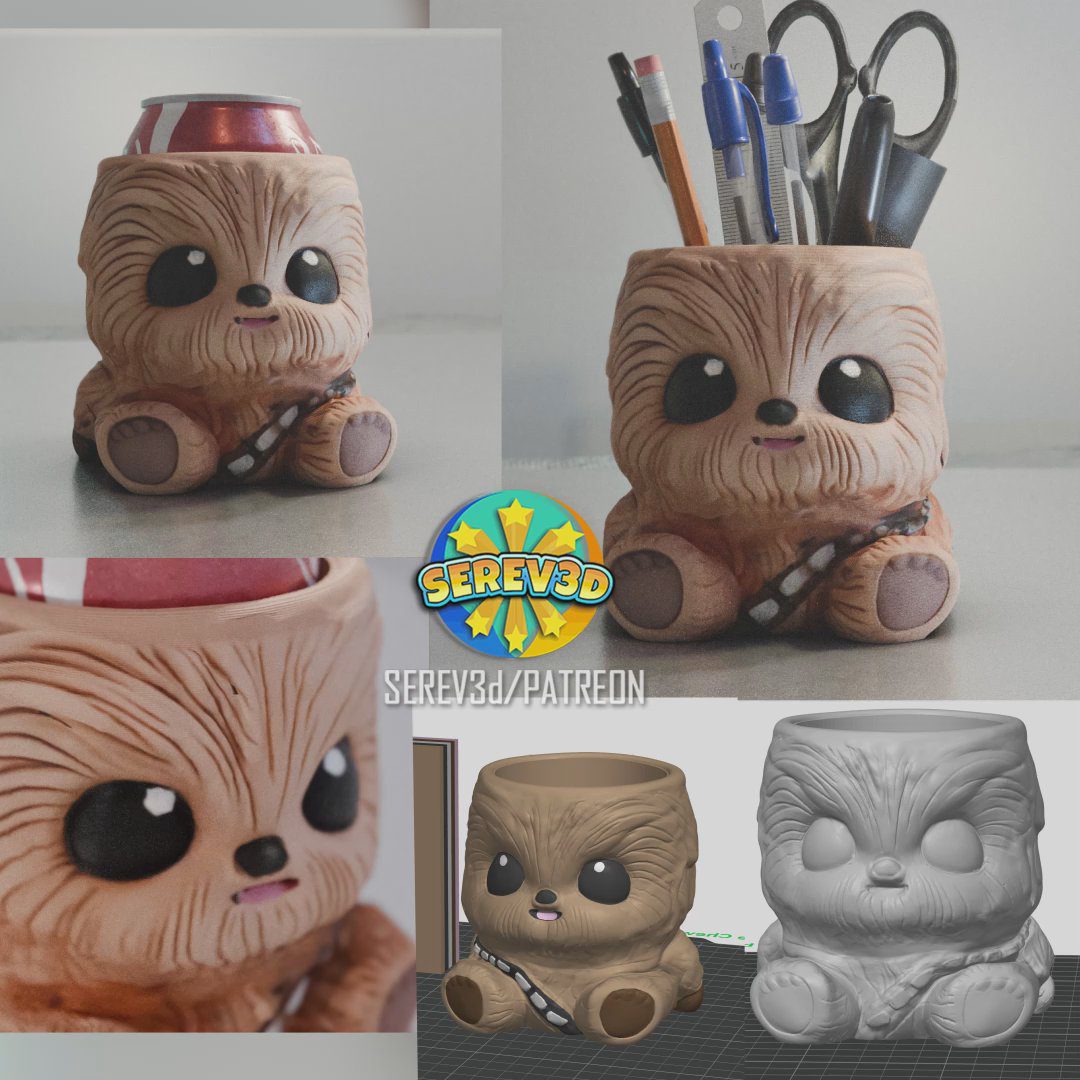
This one is for the Star Wars fans, and people who like useful and cute stuff:)
This design is very easy to print, no supports or any fancy print settings.
We provided two different size versions in the folder, one is suitable to hold a standard size soft drink can (diameter of 2.6inch/66.2mm), like any fuzzy pop drinks or beers.
The other version is a bit thicker in size, you can store your pencils, pens, brushes or any little crafty items in it.
This design prints without any supports, we provided singe & MultiColor and stl versions as well.
Realistic Pikachu is the first design of October!
Recommended print settings: (If you use Bambu or Orca slicer, all the print settings are automatically loaded in each version’s 3mf files)
-Layer height: 0.2mm , if you want finer details you can set it to 0.16 (Also you can turn on Adaptive Layer Height, if you want less visible layer lines on the top surfaces of your print
-Wall loops: 3
-Infill: 10%, Gyroid
-Supports: No Supports needed
—————————-
Recommended filaments to use without the need for painting or post processing:
Dual silk filament: TEQStone Dual Color Silk PLA Black-Red
OR
Gradient filament: iSANMATE Matte Gradient Red-orange
—————————
Resources for painting and post processing:
Filament: Polymaker PLA Matte White
Filler Primer: Rust-Oleum Filler and Sandable Primer Spray
Sandpaper: 3m Pro Grade Grit: 120, 3m Pro Grade Grit:220, 3M Wet or dry Sandpaper Grit: 600
and/or Bates- Sandpaper, 18 Pack, 12 Grits, 120 to 3000
Primer: Rust-Oleum Painter’s Touch Spray Paint White
Paint: Fantastory Craft Acrylic Paint Set
Clear coat finish: Rust-Oleum Matte Clear Coat or if you want glossy look Rust-Oleum Clear Gloss
—————————–
(if you have a multi-color AMS printer, you can also just print the colored 3mf file, but in our opinion, a real post-processing will always give a more real lifelike touch and originality to the prints!)
Post-processing steps:
-
Sanding: Start with coarse sandpaper (120 grit) to smooth layer lines, then use finer grits (220) and lastly (400-600) for a more polished surface.
-
Filler Primer: Apply a filler primer coat to cover imperfections. Let it dry completely.
-
Wet Sanding: Use 400-600 grit sandpaper for wet sanding the primer, repeating as needed for smoothness.
-
Final Primer Coat: Apply a thin layer of regular primer to create an even base for painting.
Painting & Sealing: Paint with your chosen color from the acrylic paint set, then apply a clear coat (matte or glossy) for protection and finish.
(Allow each layer to dry fully before moving to the next for the best results.)
►Click here to grab Chewy from the SEREV3d Current download links board (Accessible for paid members)
—————————–
Have fun, we are looking forward to see your 3d prints!
Don’t forget to show off your awesome makes on
►Our Patreon chats: https://www.patreon.com/serev3d/chats
►Or in our SEREV3d facebook group: https://www.facebook.com/groups/1569100737016945
Other popular 3d print groups to show off your makes:
–3d Printing for Beginners and Pros
–F**k that, I’ll just 3D print it!
–3D Printing ⚙️
——————————————-
Don’t forget to show off your awesome makes in our Patreon chats: https://www.patreon.com/serev3d/chats
Or in our SEREV3d facebook group: https://www.facebook.com/groups/1569100737016945

